
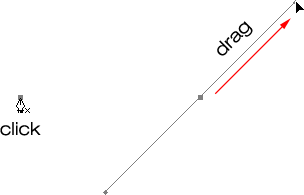
Photoshopis valikute tegemisel on tõesti kahte tüüpi inimesi - neid, kes oskavad pliiatsi tööriista kasutada, ja neid, kes vaeva näevad. Enamik inimesi paneb pliiatsi tööriista võimalikult kaua kasutama õppima, teised aga ei hakka seda kunagi õppima, uskudes, et see on lihtsalt liiga segane, liiga keeruline ja lihtsalt ebaloomulik.
Lõppkokkuvõttes kannatab nende töö Photoshopis, kuna nad jäävad Lasso tööriistale tuginedes peaaegu kõigeks, mida nad ei saa ristkülikukujuliste või elliptiliste telgiriistade abil valida. Selles Adobe Photoshopi õpetuses teeme kannatustele lõpu. Õpime, kui lihtne on pliiatsi tööriista abil valikuid teha.
Nüüd, kui ütlen "lihtne", ei pea ma silmas seda, et hakkate seda õpetust lugema ja muutute kohe pliiatsimeistriks. Pliiatsi tööriista kasutamise õppimine sarnaneb jalgrattaga sõitmise õppimisega. Kui olete teada saanud, tundub see täiesti loomulik ja te imestate, kuidas keegi võib-olla ei teadnud, kuidas midagi nii lihtsat kasutada. Kuid sellesse punkti jõudmine nõuab väikest harjutamist ja vaeva ning kui iga raamatut lugedes on jalgrattaga sõitmise kohta kirjas, võib see teile õpetada pedaalide, käikude ja pidurite toimimise põhialuseid, alles siis, kui olete ratta seljas. hoida oma tasakaalu, et tõeline õppimine algab.
Üks pliiatsi tööriista suurepäraseid asju on see, et see pole Photoshopile ainuõige. Kaugel sellest! Peaaegu kõik populaarsed fototöötlus-, graafika- ja lehepaigutusprogrammid kasutavad pliiatsi tööriista ühel või teisel kujul, nii et kui olete selle Photoshopis kasutamise selgeks õppinud, saate juba hästi aru, kuidas seda paljudes kohtades kasutada ka muud programmid!
Kust leida pliiatsi tööriista?
Enne kui hakkame rääkima sellest, mis on pliiatsi tööriist või kuidas seda kasutada, peaksime uurima, kust seda kõigepealt Photoshopist leida. Pliiatsi tööriista leiate tööriistapaletist Tööriistad, mis on grupeeritud vormiriistade, tüübi tööriista ja tee valiku (valge nool) ja otsese valiku (must nool) tööriistadest (vt vasakul olevat pilti).
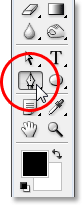
Photoshopi pliiatsi tööriist
Muidugi võib see tõstatada küsimuse, miks, kui me saame pliiatsi tööriistaga valikuid teha, siis kas see pole rühmitatud teiste valikuvahenditega (ristkülikukujuline telgiriist, elliptiline telgiriist, Lasso tööriist jne) aadressil tööriistade paleti ülaosas? Miks jääb see alla nende muude tööriistadega, mis ilmselgelt pole valikuvahendid?
See on suurepärane küsimus ja sinna tuleb lihtsalt sama hea vastus, milleni jõuame hetkega.
Miks seda nimetatakse "pliiatsi" tööriistaks?
Nagu paljudes teistes Photoshopi asjades, on Pen-tööriista kasutamise õppimise üks esimesi komistuskivisid selle nimi, sest kui on üks asi, mida teavad kõik, kes on kunagi proovinud seda kasutada, siis see pole pliiats. Vähemalt mitte sellist pastapliiatsit, millele tavaliselt mõtlete, kui kuulete sõna "pastakas". Proovige kirjutada oma nimi sellega samamoodi, nagu võiksite kirjutada oma nime pliiatsiga paberitükile ja võite lõpuks kokku tõmbuda, sassis jama ja asjad omavahel silmnähtavalt kokku tõmmata (ma muidugi arvan, et võiks väga hästi olla see, kuidas oma nimele alla kirjutate).
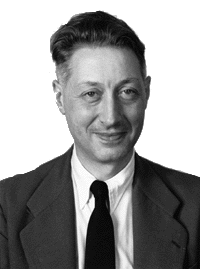 Pierre Bezier
Nii et kui see ei käitu nagu traditsiooniline tindipliiats, miks seda nimetatakse pliiatsi tööriistaks? Pliiatsi tööriista on aastate jooksul tegelikult kutsutud mitmeks asjaks ja selle all ei pea ma silmas selliseid asju, mida olete võib-olla pettumuse hetkedel sellele nimetanud. Võib-olla olete kuulnud, et seda nimetatakse Bezieri pliiatsiks või Bezieri tööriistaks, ja see on sellepärast, et selle lõi mees nimega Pierre Bezier (see on tema vasakul), prantsuse insener ja kõikehõlmav tark tüüp, kes tuli välja väljamõeldud matemaatika, mis annab tööriistale töövõimet Renault 'autofirmas töötamise ajal (Pen Tool loodi algselt autode kujundamisel).
Võib-olla olete kuulnud ka teede tööriistaks nimetatud Pliiatsi tööriista ja see on selle jaoks tõesti kõige sobivam nimi. Pliiatsi tööriist on mõeldud "radade" joonistamiseks. Pliiatsi tööriista abil valikute tegemiseks teisendame lihtsalt meie valitud tee või teed valikuteks. See algab alati teega.
Lühikoodide, toimingute ja filtrite pistikprogramm: viga lühikoodis (reklaamid-põhitõed-keskel-2)
Mis on tee?
"Tee" on ausalt öeldes midagi, mis võib mõne programmi sees nagu Photoshop tunduda pisut kohatu. Põhjus on see, et Photoshop on peamiselt pikslipõhine programm. See võtab miljonid pisikesed ruudupikslid, mis moodustavad tüüpilise digitaalse pildi, ja teeb nendega asju. Teisalt pole radadel pikslitega absoluutselt mingit pistmist, mistõttu ütlesin, et need võivad tunduda kohatud programmis, mida kasutatakse peamiselt pikslite redigeerimiseks ja joonistamiseks.
Tee pole tegelikult midagi muud kui joon, mis kulgeb ühest punktist teise, joon, mis on täiesti sõltumatu ja ei hooli selle all asuvatest pikslitest. Joon võib olla sirge või kõver, kuid see läheb alati ühest punktist teise ja nagu ma mainisin, pole sellel üldse pistmist pildi pikslitega. Tee on kujutisest endast täiesti eraldatud. Tegelikult on tee nii eraldiseisev, et kui prooviksite oma pilti printida ekraanil nähtava rajaga, siis seda paberile ei ilmu. Kui salvestasite oma pildi JPEG.webp-failina ja laadisite selle üles veebisaidile, isegi kui salvestasite pildi Photoshopis ekraanil nähtava rajaga, ei näe te seda veebisaidi pildil. Rajad on mõeldud ainult teie silmadele ja Photoshopile. Keegi teine ei näe neid kunagi, kui nad lihtsalt ei tööta teie arvutist mööda.
Raja loomiseks on meil alati vaja vähemalt kahte punkti, kuna peame teadma, kust rada algab ja kus see lõpeb. Kui kasutame piisavalt punkte, et saaksime oma tee tagasi samasse punkti, kust see algas, saame luua radadest erinevaid kujundeid, mis on täpselt see, kuidas Photoshopi erinevad Shape Tools töötavad. Ristküliku tööriist kasutab ristkülikukujulise kuju joonistamiseks punktidega ühendatud teid. Ellipsi tööriist kasutab elliptilise kuju joonistamiseks punktidega ühendatud teid, jne. Samuti töötab Photoshopi tüüpriist, kuigi Photoshop käepidemed on veidi teistsugused kui tavaliste kujundite korral, kuid Photoshopis on kõik kirjatüübid tehtud peamiselt radadest. Tegelikult saate teisendada tüübi kujunditeks, mis annab teile siis kõik samad tee redigeerimise valikud tüübiga, mille saate kujunditega töötamisel.
Võib-olla olete kuulnud ka piirjoonteks nimetatud teid ja see on üsna hea kirjeldus selle kohta, mis on tee või vähemalt see, mis see rada võib olla. Saame joonistada ruudukujulise tee ja kui me ei tee sellega midagi muud, nagu näiteks seda, et me ei täida seda värviga ega kasuta sellele lööki, siis on meil ainult ruudu põhikontuur. Sama ringi või mõne muu joonisega, mille me joonistame. Tee ise on vaid kuju kontuur. Alles siis, kui me teeme selle rajaga midagi, näiteks täidame selle, rakendame löögi või teisendame selle valikuks, muutub tee tegelikult millekski enamaks kui põhikontuuriks.
Teekonna valimise tööriista abil (mida nimetatakse ka "musta noole" tööriistaks) saate valida terve tee või üksikud punktid või tee segmendid saate valida otsevaliku tööriista ("valge noole") abil. Tee "segment" või "joone segment", nagu seda mõnikord nimetatakse, on mis tahes tee kahe punkti vahel. Näiteks ristkülikukujuline tee koosneks neljast punktist (igas nurgas üks) ja ristküliku kuju loomiseks punkte ühendavad punktid üla-, ala-, vasak- ja parempoolses osas kokku on raja segmendid . Tegelik tee ise on kõigi kuju moodustavate üksikute teesegmentide kombinatsioon.
See võib olla pisut segane, nii et vaatame, mida ma mõtlen. Avage uus dokument Photoshopis. Pole tähtis, mis suurus see on. Valin eelseadete hulgast suuruse 640x480, kuid nagu ma ütlesin, pole vahet, millise suuruse valid. Valige palett Tööriistad oma pliiatsi tööriist. Pliiatsi tööriista saate valida ka lihtsalt klaviatuuri P tähe vajutamise teel.
Kaks pastapliiatsi režiimi
Nüüd, enne kui jätkame, peame kõigepealt veenduma, et töötame radadega. Seda seetõttu, et pliiatsi tööriistal on tegelikult kaks erinevat režiimi, milles see töötab, ja vaikimisi kasutab see teist. Kui pliiatsi tööriist on valitud, näeme ekraani ülaosas oleval suvandiribal valikut kolmest ikoonist:

Photoshopis suvandiriba näitab kolme ikooni, mis tähistavad kõiki kolme pliiatsi tööriista režiimi.
Ma tean, et ütlesin, et pliiatsi tööriistal on kaks režiimi, kuid justkui segasemaks muutmiseks on seal kolm ikooni, kuid paremal asuv ikoon, mis on Fill pixels, on hall ja ei tööta. koos pliiatsi tööriistaga. See on saadaval ainult siis, kui töötate erinevate vormiriistadega, seega peame vaatama ainult kahte ikooni.
Ikoon vasakul on kuju kihtide ikoon, tuntud ka kui "mitte see, mida me tahame", ja see on vaikimisi valitud ikoon. Kui me töötaksime Pen-tööriistaga, mille ikoon oleks valitud, joonistaksime kujundeid, just nagu kasutaksime mõnda erinevat kujuvahendeid, välja arvatud see, et selle asemel, et joonistada etteantud kuju, nagu ristkülik või ellips, võiks joonistada mis tahes kuju, mida me tahtsime. Nagu ma juba ütlesin, pole see see, mida me tahame. Tahame selle kõrval olevat ikooni, radade ikooni, nii et minge edasi ja klõpsake sellel valimiseks:

Photoshopi õpetused: teede tööriistaga töötamiseks klõpsake suvandiribal ikooni "Rajad".
Kui pliiatsi tööriist on valitud ja suvandiribal valitud ikoon Paths, klõpsake üks kord kõikjal dokumendi sees. Ärge klõpsake ja lohistage, vaid klõpsake. Kui teete, lisate väikese ruudukujulise punkti. Olen seda siin suurendanud:

Punkti lisamiseks klõpsake üks kord dokumendi sees pliiatsi tööriistaga.
See esimene punkt, mille me just lisasime, on meie tee alguspunkt. Praegu pole meil tegelikult teed. Kõik, mis meil on, on lähtepunkt. "Punkti" nimetatakse tehniliselt ankur- või ankurpunktiks ja seda nimetatakse sellepärast, et see ankurdab tee oma kohale. See esimene punkt ankurdab selle koha alguspunkti dokumendi sees. Kui lisame veel punkte, ankurdab iga neist tee selles kohas oma kohale.
Lisame veel ühe punkti. Klõpsake kuskil mujal dokumendi sees. Kõikjal tehakse. Klõpsan kuskil oma lähtepunktist paremal:

Photoshopi õpetused: lisage teine kinnituspunkt, klõpsates kuskil mujal dokumendi sees.
Lisasin nüüd teise kinnituspunkti ja vaatame, mis juhtus. Mul on nüüd sirge joon, mis ühendab need kaks punkti omavahel! See sirge on minu tee. Nagu ma varem mainisin, vajame tee loomiseks vähemalt kahte punkti, kuna peame teadma, kust rada algab ja kus see lõpeb, ja nüüd, kui meil on nii algus- kui ka lõpp-punkt, suutis Photoshop ühendada kaks punkti koos, luues meie tee.
Lisame veel mõned punktid lihtsalt lõbu pärast. Klõpsake veel mõni kord dokumendi erinevates kohtades. Ärge jälle klõpsake ja lohistage, vaid klõpsake:
Lisage täiendavaid punkte, klõpsates dokumendi erinevatel kohtadel.
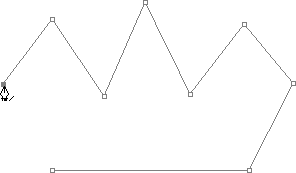
Ülaloleval pildil olen lisanud veel seitse kinnituspunkti, klõpsates pliiatsi tööriistaga erinevatel kohtadel, ja iga kord, kui ühe lisasin, suurenes mu tee pikkus, kuna eelmise punkti ja uue punkti vahele lisati uus tee "segment" uus punkt. Minu tee koosneb nüüd üheksast ankurduspunktist ja kaheksast raja segmendist. Võiksin jätkata dokumendis sees klõpsamist, et lisada veel ankurdamiskohti ja teesegmente, kuid mida ma tegelikult praegu teha tahaksin, on minu tee sulgeda, nii et see moodustab täieliku kuju.
Tee sulgemine
Tee sulgemiseks peame kõik klõpsama veel kord oma algsel lähtepunktil. Kui viite hiirekursori alguspunkti kohale, näete pliiatsiikooni paremas alanurgas väikest ringi:

Kui hõljutate kursorit raja alguse alguspunkti kohal, kuvatakse pliiatsiikooni paremasse alumisse nurka väike ring.
See ring ütleb meile, et tuleme oma teekonnaga "täisringi", viies selle lõpuni seal, kus see algas. Selle sulgemiseks klõpsake lihtsalt otse alguspunkti.
Allpool näeme, et minu teest on saanud suletud tee ja see on nüüd kuju põhivorm:
Tee on nüüd suletud, lõpetades lähtepunkti, luues suletud tee.
Kuigi see tee joonistati lihtsalt lõbu pärast kui näide sellest, kuidas pliiatsi tööriistaga põhiteed joonistada, saan selle tee hõlpsalt valikuks muuta. Selleks vajame Photoshopi teede paletti ja vaatame seda järgmisena.
Valiku tee pööramine
Siiani oleme vaadanud, mis on tee ja kuidas Photoshopi pliiatsi tööriista abil põhitee üles joonistada. Aga kuidas te rajalt valiku teete?
Lihtne! Teel on valiku tegemiseks mitu võimalust, sealhulgas käepärane kiirklahv, kuid enne kui vaatame kiiret moodi, vaatame ametlikku viisi. "Ametlik viis" hõlmab Photoshop's Paths paleti kasutamist, mis leiate rühmitamiseks kihtide paleti ja kanalite paletiga:
Photoshopi teede palett.
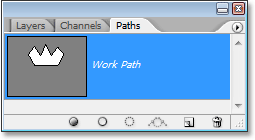
Esmapilgul paistab tee Paths väga sarnane Photoshopi kihtide paletiga ja Adobe muutis selle sihikindlalt, nii et tunnete end selle kasutamisel mugavamalt. Näeme äsja loodud raja kuju pisipilti ja vaikimisi nimetab Photoshop tee "Tööteeks", mis on põhimõtteliselt väljamõeldud viis öelda "ajutine", justkui peaksite looma mõne muu nüüd ilma seda nime ümber nimetades kõigeks muuks, asendatakse see tee uuega. Teil võib olla ainult üks „Töötee”, nii et kui soovite seda säilitada, peate enne uue tee loomist topeltklõpsama selle nime Paths palett ja nimetama selle millelegi muule.
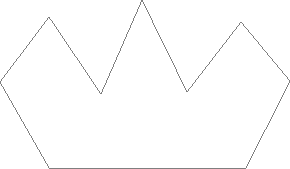
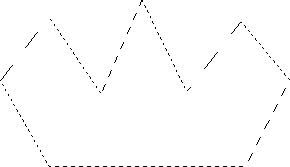
Kuna minu tee näeb natuke nagu kroon välja, siis topeltklõpsan nimel "Töötee", mis avab Photoshopi dialoogiboksi Salvesta tee, ja nimetan oma tee ümber "krooniks":

Ajutise töötee saab salvestada lihtsalt ümbernimetades.
Kui see on valmis, klõpsan nuppu OK. Kui nüüd vaatan uuesti oma radade paletti, näen seda piisavalt kindlalt, on minu "Töötee" ümber nimetatud "krooniks":
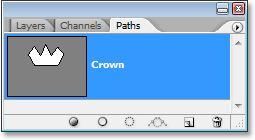
Teekondade palett, mis näitab, et tee on ümber nimetatud "krooniks".
Selle ümbernimetamisega on tee nüüd salvestatud ja see ei kao minust, kui lähen looma uut rada. Samuti salvestatakse kõik salvestatud teed Photoshopi dokumendiga, nii et nüüd, kui ma oma dokumendi salvestan, salvestatakse tee koos sellega ja järgmine kord, kui dokumendi avan, jääb see tee sinna Paths paletti.
Tee salvestamine pole midagi, mida peate tegema, et see valikuks muuta. Enamikul juhtudel, kui kasutate pliiatsi tööriista valikute tegemiseks, pole teil enam vaja seda rada teha, kui olete sellest valiku teinud, nii et seda pole vaja salvestada. Kui soovite selle siiski salvestada, nimetage see lihtsalt muuks kui "Töötee" ja see on salvestatud.
Teekonna valimiseks, kui vaatame teede paleti alaosa, näeme mitmeid ikoone. Need ikoonid võimaldavad meil oma teega erinevaid asju teha. Esimene vasakul asuv ikoon on Täitke tee esiplaani värviikooniga ja nagu nimigi viitab, täidab see klõpsamise tee meie praeguse esiplaani värviga. Huvitav, kuid see pole see, mida me tahame. Teine vasakpoolne ikoon on pintsliikooniga käigutee, mis rakendab meie teele tõmbe, kasutades ükskõik millist praegu valitud harja.
See on suurepärane võimalus huvitavate efektide loomiseks Photoshopis, kuid selleks, mida me siin teeme, muutes tee valikuks, pole see ka see, mida me tahame. Soovime kolmandat ikooni vasakult, laadimistee valikuikoonina:
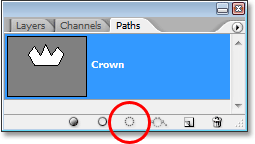
Radade paleti allosas asuv ikoon "Laadi tee valikuna".
Niipea kui ma sellel ikoonil klõpsan, muutub minu tee dokumendis sees valikuks, nagu oleksin selle loonud mõne Photoshopi tavalisemate tööriistade abil:
Tee on nüüd muudetud valikuks.
See on nii lihtne! Tegelikult on see veelgi lihtsam, sest seal on klaviatuuri otseteed tee valimiseks muutmiseks, ilma et peaksite üldse Paths paletti vahetama. Kui olete oma tee joonistanud ja olete valmis selle valikuks muutma, vajutage lihtsalt Ctrl + Enter (Win) / Command + Return (Mac), et Photoshop muudaks selle tee valikuks.
Nüüdseks võib see teile pisut ilmsem olla, miks - ehkki pliiatsi tööriist on väga suur valik - pole see rühmitatud teiste valikuvahenditega, mis asuvad tööriistade paleti ülaosas. Põhjus on see, et pliiatsi tööriist on peamiselt tee tööriist. See loob valikuid, luues kõigepealt rajad, ja sel põhjusel on sellel rohkem ühist mitmesuguste Shape Tools ja Type Tool-iga, mis kõik kasutavad teid, kui põhiliste valikuvahenditega, nagu ristkülikukujuline Marquee Tool või Lasso. Tööriist, mis teeb valikud ainult pikslite põhjal.
Vaatame praktilist näidet seni õpitu kohta. Siin on meil foto peatumismärgist mõne kaljuseina ees:

Foto stoppmärgist.
Ütleme nii, et tahtsin selle stoppmärgi valida, et saaksin selle oma kihile kopeerida. Peatumismärk koosneb ainult ühest sirgjoonest, mis teeb selle äärmiselt lihtsaks. Esiteks on mul vaja oma tee alguspunkti, seega alustan märgi vasakus ülanurgas, klõpsates üks kord esialgse kinnituspunkti asetamiseks. Sel juhul pole vahet, kust ma rada alustan, vaid alustan vasakus ülanurgas:
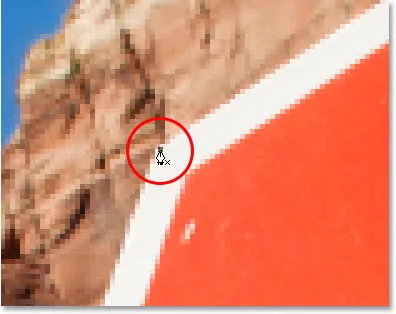
Kui klõpsate üks kord stoppmärgi vasakus ülanurgas, et alustada rada algse kinnituspunktiga.
Pange tähele, kuidas mind siia klõpsates suurendatakse. Pliiatsi tööriistaga valiku tegemisel on teil oma pildil pisut suumimiseks lihtsam. Sel moel võite olla kindel, et hoiate oma teed just selles piirkonnas, mille soovite valida.
Praegu pole mul teed, mul on lihtsalt oma tee alguspunkt. Raja loomiseks on vaja vaid minna ümber märgi, lisades igasse nurka kinnituspunkti, kus rada peab suunda muutma. Kui lisan iga kinnituspunkti, ilmub uus teelõik, mis ühendab eelmist kinnituspunkti uuega, kuni olen kõik märgi ümber käinud. Tee sulgemiseks klõpsan lihtsalt tagasi algsele lähtepunktile. Alloleval ekraanipildil on seda pisut raske näha, kuid mul on nüüd tee kogu peatumismärgi ümber, sealhulgas postitus, mille külge see on kinnitatud, klõpsates lihtsalt ümber nurkade, kus rada peab suunda muutma, klõpsates:

Nüüd kuvatakse pildil peatusmärgi ümber tee.
Kui ma nüüd vaatan oma radade paletti, näen väga selgelt, et mul on stoppmärgi kujuga tee:
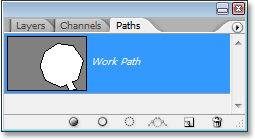
Photoshopi teede palett näitab stoppmärgi ümber tõmmatud teed.
Pange tähele, kuidas Photoshop on nimetanud tee "Tööteeks", mis tähendab, et see tee on ajutine ja ma kaotan selle, kui loon teistsuguse tee, ilma et peaksin selle esmalt ümber nimetama. Isegi kui ma uut rada ei loo, kaotan selle dokumendi sulgemisel ikkagi, kui ma seda kõigepealt ei salvesta. Ma ei pea seda teed siiski salvestama, nii et ma ei muretse selle pärast. Enamikul juhtudel ei pea te ka selle pärast muretsema.
Oma tee valimiseks teisendamiseks klõpsan Kihtide paleti allosas ikoonil Laadi tee või siis võiksin sama lihtsalt vajutada klahve Ctrl + Enter (Win) / Command + Return (Mac):
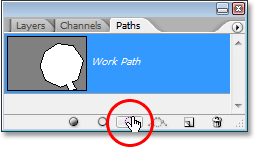
Teekonna valimiseks teisendamiseks klõpsake teede paletis ikooni "Laadi tee valikuna" või vajutage "Ctrl + Enter" (Win) / "Command + Delete" (Mac).
Niipea kui ma seda teen, teisendatakse minu tee valikuks ja stopp-märk on nüüd valitud:

Pärast tee teisendamiseks valimist on stoppmärk nüüd valitud.
Lülitun tagasi oma kihtide paletti ja peatumismärgi oma kihile kopeerimiseks kasutan kiirklahvi Ctrl + J (Win) / Command + J (Mac), mis paigutab märgi omaette kiht taustkihi kohal:
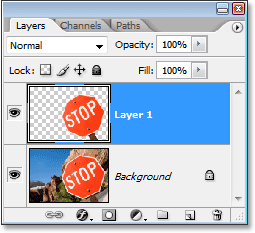
Stoppmärk on nüüd kopeeritud eraldi kihile.
Nüüd, kui märk on oma kihil, saan sellega teha kõike, mis mulle meeldib, vahetada tausta erineva kujutisega või muuta taust mustvalgeks, jättes märgi värviliseks, mida iganes ma oskan mõelda. Asi on selles, et suutsin märgi hõlpsalt valida, klõpsates nurkades pliiatsi tööriistaga, mis lõi tee ümber märgi, ja siis teisendasin selle tee lihtsalt valikuks.
Siiani on Photoshopis pliiatsi tööriistaga valikute tegemise kohta teada saanud, et pliiats on igati valikuriist kui Photoshopi levinumad tööriistad nagu ristkülikukujuline telg ja Lasso tööriistad, kuid valiku tegemise asemel pikslitel, nagu need muud tööriistad teevad, joonistab pliiatsi tööriist rajad, mida saab seejärel hõlpsasti valikuteks teisendada, kasutades selleks kas palettide paletti või kiiret kiirklahvi.
Sellepärast ei leidu pliiatsi tööriistapaleti ülaosas koos teiste pikslipõhiste valikuvahenditega, vaid on selle asemel rühmitatud tee tööriistadega, nagu erinevad kuju tööriistad, tüüpi tööriist ning tee valimise ja otsese valiku tööriistad . Pliiatsi tööriist on seotud teedega, mitte pikslitega.
Oleme õppinud, et saame oma dokumendi sisse lisada kinnituspunkte, mis kinnistavad paiga, klõpsates lihtsalt pliiatsi tööriistaga eri kohtades, ja aina rohkem ankurduspunkte lisades loome tee iga uue punktina on eelmise punktiga ühendatud uue rajasegmendiga. Samuti oleme õppinud, et tee on tavaliselt nn "trükkimata element", mis tähendab, et hoolimata sellest, kui palju teid lisame, pole ükski neist pilti printimisel paberile nähtav. . Samuti pole need nähtavad, kui kuvame pilti veebisaidil. Rajad on Photoshopis töötades nähtavad ainult meile (kuigi ka teised programmid, näiteks Adobe Illustrator, toetavad teid). Alles siis, kui me teeme selle rajaga midagi, näiteks täidame selle värviga, rakendame sellele löögi või teisendame selle valikuks, ei muutu rada millekski enamaks kui lihtsalt kuju põhiliseks mittetrükkimiseks.
Nägime, kui lihtne oleks pliiatsi tööriista abil valida midagi stoppmärgi taolist, visandades selle sirgjoonelistest rajasegmentidest koosneva rajaga ja muutes selle tee valikuks. See on suurepärane, aga tegelikult pole me veel midagi sellist teinud, mida poleks saanud teha kergemini näiteks Lasso tööriistaga või veelgi parem - polügoonilise Lasso tööriistaga, mis on spetsiaalselt ehitatud lamedate kujundite valimiseks nagu meie peatus. märk. Võimalik, et kui teil pole liiklusmärkidest mingit imelikku põnevust, tahate varem või hiljem valida midagi pisut huvitavamat ja "huvitava" all mõtlen väljakutsuvamat. Ja "väljakutse" all pean silmas midagi, mis sisaldab kõveraid. Kumera objekti valimine Photoshopis toimub tavaliselt siis, kui leiate, et kaotate austuse põhiliste valikuvahendite suhtes. Õnneks juhtub see olema ka aeg, mil pliiatsi tööriist tõesti särab!
Enne kui jätkame, peaksin rõhutama, et kõik, mis me selle hetkeni teinud oleme, on olnud üsna lihtne. Klõpsake siin, klõpsake seal, teisendage tee valmiks, tehtud. See järgmine osa, kus jõuame kõverate joonistamiseni, pole just nii lihtne, kuigi see pole kindlasti keeruline, kuid kui see on teie esimene kord pliiatsi tööriistaga või kui teil pole sellega palju kogemusi, võib kõveratega töötamine tunduda natuke ebaloomulik ja isegi pisut üleolev. Kindlasti tuleb siia "jalgrattaga sõitmise" analoogia. Võite alguses paar korda maha kukkuda ja imestada, kuidas keegi sellega hakkama saab, kuid mida rohkem te harjutate ja mida rohkem te sellega kinni peate, seda mõistlikum see kõik on? hakkab tegema. Üldse ei tundu see teile kohe teist laadi ja saate äkki aru, miks nii paljud inimesed vannuvad, et pliiatsi tööriist on Photoshopis üks suurimaid tööriistu! Tõsiselt, see tegelikult on.
Suuna käepidemete saamiseks käepidemed
Alustame uuesti pliiatsi tööriistaga. Avage uus tühi Photoshop-dokument või kustutage lihtsalt olemasolevas dokumendis seni tehtud toiming, nii et alustame värsket. Seejärel, kui pliiatsi tööriist on valitud ja suvandiribal valitud suvand Paths (pidage meeles, et vaikeseade on suvand Shape layer, seega peate kindlasti olema valitud suvand Paths), klõpsake üks kord kõikjal dokumendi sees, täpselt nagu tegime enne. Seekord, mitte ainult kinnituspunkti lisamiseks klõpsamise asemel klõpsake ja seejärel lohistage hiirt ankurduspunktist veidi eemal enne hiirenupu vabastamist:
Klõpsake pliiatsi tööriista abil dokumendi mis tahes asukohta ja lohistage seejärel kinnituspunktist pisut eemal.
Kui olete lõpetanud, näete kinnituspunkti, mille kaks rida ulatuvad sellest välja. Esmapilgul võite arvata, et oleme kuidagi suutnud pliiatsi tööriista abil tee maha tõmmata. Lõppude lõpuks näib, et meil on kolm kinnituspunkti, üks mõlemas otsas ja teine keskel, kusjuures neid ühendavad kaks rajasegmenti. Kui vaatame natuke lähemale, siis näeme, et kummaski otsas olevad punktid on natuke väiksemad kui keskel ja et need on tegelikult teistsuguse kujuga. Keskmine keskel on ruut ja nagu nägime, on kinnituspunkt ruudukujuline, kuid kummaski otsas olevad näivad olevat rombikujulised. Kas mõni kinnituspunkt on ruudukujuline ja mõni rombikujuline?
Ei. Kõik kinnituspunktid on ruudukujulised ja nad on kõik ühesuurused, mis tähendab, et need väiksemad, rombikujulised punktid otstes ei ole kinnituspunktid. Ja kui need ei ole ankurduspunktid, tähendab see, et jooned pole teelõigud, kuna tee loomiseks on meil vaja vähemalt kahte kinnituspunkti ja praegu on ainus ankurduspunkt meil keset. Millised on siis need jooned, mis ulatuvad kinnituspunktist välja? Nad on suuna käepidemed!
"Ah, suuna käepidemed!" sa ütled. "Nüüd ma saan aru!"
… … …………….
"Oota, ei, ma ei tee. Mis kuradi need käepidemed on?"
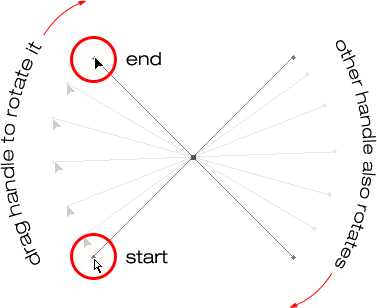
Suunakäepidemed on noh, käepidemed ja neid kasutatakse ainult kõverjooneliste segmentide loomisel. Sirgete teelõikude loomisel pole vaja käepidemeid. Neid on tavaliselt kaks, ehkki mõnikord on neid ainult üks ja nagu me juba nägime, ulatuvad nad kinnituspunktidest välja. Neid nimetatakse "käepidemeteks", kuna nagu me hetkega näeme, saate neid tegelikult haarata ja neid ümber tõsta.
Suuna käepidemed kontrollivad kahte asja. Nad kontrollivad kõvera nurka ja nad kontrollivad kõvera pikkust ning teevad seda tõesti kenasti. Põhjus, miks neid tavaliselt on, on seetõttu, et üks neist reguleerib kinnituspunkti jõudva kõvera nurka ja pikkust ning teine kontrollib kinnituspunktist välja voolava kõvera nurka ja pikkust.
Enne kui vaatame, kuidas juhtida käepidemeid kõverate abil, vaatame kõigepealt, kuidas käepidemeid ise juhtida, kuna meie edu kõverate joonistamisel sõltub palju meie võimest käepidemeid juhtida. Ärge muretsege, see pole, nagu öeldakse, raketiteadus. Seal on vaid mõned lihtsad asjad, mida peate õppima. Oleme juba näinud, kuidas luua suunakäepidemeid, klõpsates pliiatsi tööriistaga ja lohistades seejärel kinnituspunktist eemale. Mida kaugemale kinnituspunktist me lohistame, seda pikemaks jäävad suuna käepidemed. Mida pikem käepide, seda pikem on kõver. Lühike käepide, lühike kõver. Pikk käepide, pikk kõver.
Üks tore asi, mida saate pliiatsi tööriista kohta üsna kiiresti õppida, on see, et see on äärmiselt andestav. Pole üldse põhjust muretseda selle pärast, et sellega esimest korda rajad kokku tõmmata, sest saame valmis tagasi minna ja asjad hõlpsalt korda seada! Kas asetasite kinnituspunkti valesse kohta? Pole probleemi! Liigutage seda lihtsalt kuhu vaja! Vaatame, kuidas seda hetkega teha. Kas tõmbasite vales suunas suuna käepideme välja? Pole probleemi. Haarake käepidemest ja pöörake seda vajalikus suunas. Jällegi näeme, kuidas seda teha. Kas üks teie suuna käepidemetest on liiga pikk või liiga lühike? Pole üldse probleemi. Lihtsalt klõpsake sellel ja lohistage siis vastavalt vajadusele pikemaks või lühemaks (jep, vaatame, kuidas seda ka teha). Rajad on igal ajal täielikult redigeeritavad, nii et pole mingit põhjust muretseda vea tegemise või selle esmakordse parandamise pärast. Kas see ei muuda teid juba pisut paremaks?
Suunakäepidemete pööramine ja muutmine
Nagu ma mainisin, nimetatakse neid suuna "käepidemeteks", kuna saate neid käepidemetena haarata ja neid liigutada. Vaatame, kuidas seda teha. Esiteks vaatame, kuidas mõlemat käepidet korraga pöörata. Kasutades kinnituspunkti ja juba loodud kahte käepidet, hoidke all klahvi Ctrl (Win) / Command (Mac). Näete, et teie pliiatsi tööriista ikoon muutub ajutiselt otsevaliku tööriista (valge nool) ikooniks, ja kuna pliiatsi tööriist on valitud, muutub klahvi "Ctrl / käsk" hoidmine kiireks otseteks ajutise juurdepääsu saamiseks otsevaliku tööriistale, mis on mida me kasutame oma tee erinevate osade valimiseks. Seejärel klõpsake lihtsalt ühe väikese käepideme lõpus asuvat väikest rombikujutist ("rea" klõpsamine iseenesest ei toimi, nii et peate millegi tegemiseks alati klõpsama käepideme lõpus asuvat rombikujutist). koos sellega) ja lohistage seda ümber kinnituspunkti, et seda pöörata. Ühte käepidet pöörates pöördub teine käepide sellega vastupidises suunas, nagu näeks saag. Samuti võite märgata, et niipea, kui hakkate käepidet lohistama, muutub hiirekursori ikoon taas, seekord Teisalda tööriista ikooniks, kuna me kolime midagi ühest kohast teise:
Hoidke all klahvi "Ctrl" (Win) / "Command" (Mac) ja klõpsake mõlema suuna käepideme lõpus, seejärel lohistage käepidet, et pöörata see ümber kinnituspunkti. Ühte käepidet lohistades pöörleb teine vastupidises suunas.
Kui olete käepidet lohistama hakanud, saate klahvi "Ctrl / Command" vabastada. Pole vaja seda kogu aeg all hoida.
Suuna käepideme suuruse muutmiseks selle pööramisel lohistage käepideme otsa kinnituspunkti suunas, et see lühemaks muutuks, või lohistage kinnituspunktist eemale, et seda pikemaks muuta. Nagu ma eespool mainisin, muudab lühem käepide kõvera lühemaks ja pikem käepide muudab kõvera pikemaks. Mõlemat käepidet ei saa samal ajal muuta, nii et kui peate mõlemat käepidet muutma, peate mõlemad pikem või lühem eraldi lohistama. Ainus, mida saate teha mõlemale korraga, on nende pööramine. Kui olete juba käepidemete pööramise järel hiirenuppu vabastanud ja kursor on muutunud Pen-tööriista ikooniks ning peate ühe käepideme suurust muutma, peate ajutiselt ajutiselt uuesti hoidma all nuppu Ctrl / Command lülituge tagasi otsevaliku tööriistale ja klõpsake siis suuruse muutmiseks käepideme lõppu ja lohistage seda:
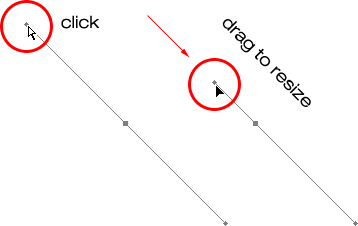
Lohistage käepidemete otsi kinnituspunkti suunas, et neid lühendada, või lohistage kinnituspunktist eemale, et neid pikemaks muuta.
Nüüd vaatame, kuidas käepidemeid pöörata üksteisest sõltumatult. To rotate one handle without affecting the other one, first release your mouse button if you've been rotating or resizing the handles so your cursor changes back into the Pen Tool icon. Then, instead of holding down "Ctrl/Command", which moves both handles at once, hold down your Alt (Win) / Option (Mac) key and click on the end of either of the direction handles. You'll see your cursor change into the Convert Point Tool icon, which looks like a simplified arrow made of only two lines, almost like an upside down letter "v" (except that it's not quite upside down). Then, simply drag the handle around the anchor point to rotate it, just as you did before, and this time, the handle will rotate independently of the other one, breaking the connection between them:
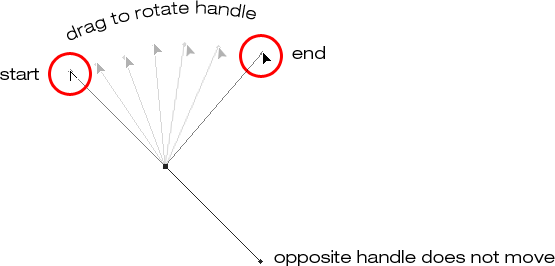
Hold down "Alt" (Win) / "Option" (Mac) and click on the end of either of the direction handles, then drag the handle to rotate it around the anchor point independently of the other handle.
Again, you can release your "Alt/Option" key after you've started dragging. You don't have to hold it down the whole time.
You can also resize direction handles using the "Alt/Option" key in exactly the same way as you can with the "Ctrl/Command" key. If you're in the process of rotating a handle, simply drag it in towards the anchor point to make it shorter or away from the anchor point to make it longer. If you've already released your mouse button and your cursor is showing the Pen Tool icon again, you'll need to hold down "Alt/Option" once again, then click on the end of the handle and drag it to resize it.
Is there a difference between resizing the handles using "Ctrl/Command" and using "Alt/Option" to do it? Yes there is. If you haven't yet "broken the connection" between the handles by dragging one independently of the other, resizing a handle using "Ctrl/Command" will keep the handles connected together. It won't resize both handles at once, but it won't break the connection between them either so you'll still be able to rotate them together if you need to. If you resize a handle using "Alt/Option", you'll break the connection between the handles. Even if you don't rotate the handle as you're resizing it, the connection will still be broken.
What if you've broken the connection between the handles by rotating them using "Alt/Option" and then want to rotate them together again? Can you "rebuild the connection", so-to-speak, by selecting one of them while holding down "Ctrl/Command" as before? Good question, and the answer is no. Once you've broken the connection between the handles, the "Ctrl/Command" key on its own won't bring it back. You'll need to select one of the handles while holding Ctrl+Alt (Win) / Command+Option (Mac) at that point in order to move the handles together again.
Quick Summary So Far …
We've covered a lot of information here about working with direction handles, so before we move on and start drawing some actual curves, let's do a quick recap:
- To add an anchor point, simply click with the Pen Tool.
- To add an anchor point with direction handles extending out from it, click with the Pen Tool, then drag away from the anchor point before releasing your mouse button. The further you drag, the longer the direction handles will be.
- To rotate the direction handles together, hold down Ctrl (Win) / Command (Mac), which will temporarily switch you to the Direct Selection Tool, then click on the end of either handle and drag it around the anchor point. The other handle will rotate in the opposite direction.
- To rotate the direction handles independently, hold down Alt (Win) / Option (Mac), which will temporarily switch you to the Convert Point Tool, then click on the end of either handle and drag it around the anchor point. The other handle will not rotate.
- To resize handles without breaking the connection between them, hold down Ctrl (Win) / Command (Mac) to switch to the Direct Selection Tool, then click on the end of either handle. Drag it towards the anchor point to make it shorter, or drag it away from the anchor point to make it longer.
- To resize handles and break the connection between them, hold down Alt (Win) / Option (Mac) to switch to the Convert Point Tool, then click on the end of either handle. Drag it towards the anchor point to make it shorter, or drag it away from the anchor point to make it longer.
- To rotate the direction handles together after breaking the connection, hold down Ctrl+Alt (Win) / Command+Option (Mac), then click on the end of either handle and drag it around the anchor point. The other handle will once again rotate with it.
Okay, that pretty much covers the basics of how to control the direction handles. Let's see how we can use them to draw some curves!
We've covered a lot of ground so far. We know about anchor points and direction handles. We know that in order to draw straight path segments, all we need to do is lay down a series of anchor points wherever we need them simply by clicking with the Pen Tool, and as we add more and more anchor points, we add more straight sections to our path. We know how to create direction handles and how to rotate them, either together or separately, and how to resize them.
We know how to turn a path into a selection by clicking on the "Load path as selection" icon at the bottom of the Paths palette or by simply pressing "Ctrl+Enter" (Win) / "Command+Return" (Mac) on the keyboard. One thing I didn't mention yet is that regardless of whether our path consists of straight lines,
curves, or a combination of straight lines and curves, converting it into a selection is done exactly the same way, and we've already learned how to do it, which means we're well on our way to mastering making selections with the pen! All we need to do is get a bit of practice drawing curves, which is exactly what we're about to do!
Kas ikka kerite? Laadige see õpetus alla PDF-na!
Drawing A Curve
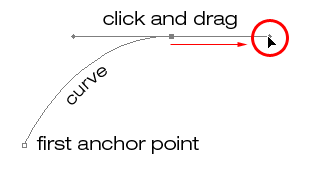
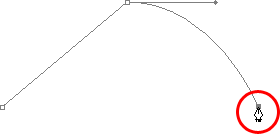
Let's once again start fresh, either by opening up a new blank document in Photoshop or by deleting what you've already done. We're going to draw our first curve so we can put all of our newly-aquired direction handle knowledge to use. First, with the Pen Tool selected and the Paths option selected in the Options Bar, click once somewhere in your document to add an anchor point. Just click, don't click and drag. You should have one single anchor point on the screen when you're done.
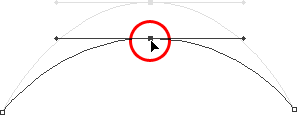
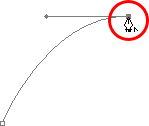
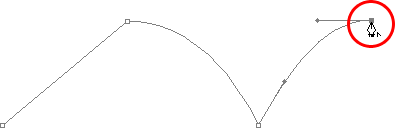
Then, move your mouse cursor up and to the right of your initial anchor point. Click again to add a second anchor point, but this time, drag your mouse a little to the right of the anchor point to drag out direction handles. Hold down Shift as you drag to constrain your movement to a horizontal direction. As you drag out the direction handles, you'll see your path appearing as a curve between the two anchor points! The further you drag your mouse, the longer you make the direction handles, and the more of a curve you create:
Click once to add an anchor point, then click and drag out a second anchor point with direction handles, creating a curved path segment between the two points.
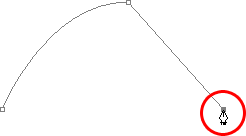
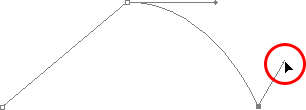
Click down and to the right of the second anchor point to add a third anchor point. This time, don't click and drag, just click:
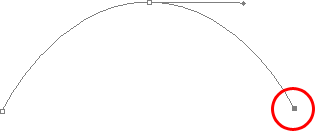
Add a third anchor point down and to the right of the second one by clicking with the Pen Tool.
As soon as you add the third anchor point, a second path segment will appear, joining the second anchor point with the third one. And because our second anchor point has direction handles extending from it, this new path segment is also curved! We now have a nice, smooth arc starting from the first point on the left, then passing through the anchor point with the direction handles up top, and coming to an end at the third point.
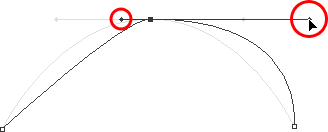
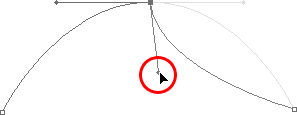
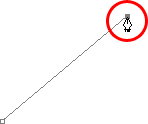
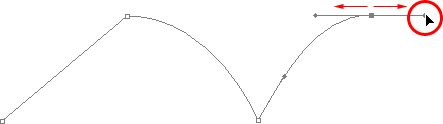
One thing you may have noticed, and you can see it in the screenshot above, is that when you added the third anchor point, the direction handle extending out the left side of the second anchor point disappeared. It's still there, Photoshop simply hid it from view. To see it again, use the keyboard shortcut we've already learned to temporarily switch to the Direct Selection Tool, which is by holding down the Ctrl (Win) / Command (Mac) key, and then click on the second anchor point to select it. As soon as you do, the missing direction handle reappears as if it was there the whole time (which it was):

Hold down the "Ctrl" (Win) / "Command" (Mac) key to temporarily switch to the Direct Selection Tool, then click on the top anchor point to select it. The missing anchor point reappears.
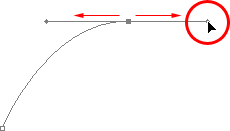
With your "Ctrl/Command" key still held down so you still have access to the Direct Selection Tool, try resizing each direction handle by clicking on the end of each one to select it and then dragging it towards and away from its anchor point. Again, hold "Shift" as you drag to constrain your movement horizontally, and watch what happens. As you increase the length of a handle, you get more of a curve, and as you decrease its length, you get less of a curve. Also notice that each handle controls its own side of the curve. The handle on the left controls the curve coming into the anchor point from the left, and the handle on the right controls the curve flowing out from the anchor point on the right.
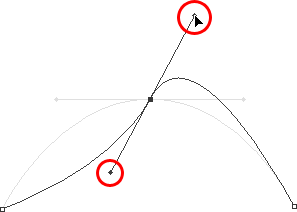
Here, I've made my handle on the left shorter, and as we can see, there's much less of a curve now than there was originally, almost becoming a straight line. I've also made the handle on the right longer, and as a result, the curve on the right is now much more pronounced. The faint curve is the original for comparison:
Change the shape of the curves by resizing the direction handles. The left handle controls the left curve, and the right handle controls the right curve.
I'm going to undo my changes by pressing Ctrl+Alt+Z (Win) / Command+Option+Z (Mac) a couple of times to set my direction handles back to their original sizes so they're equal length once again. Now let's try rotating the handles. Hold down "Ctrl/Command" once again to access the Direct Selection Tool, then click on the end of either handle to select it and try rotating it around the anchor point. Since we selected the handle with "Ctrl/Command", both handles rotate together. Here I've dragged my left handle down and to the right, and the angle of the curve on the left changed along with it, now appearing as more of a slope as it rises up towards the anchor point. By dragging the left handle down and to the right, I caused the right handle to rotate up and to the left, and again, the angle of the curve on the right changed along with it, now rising above the anchor point briefly before making a steep decent down to the anchor point on the right. Again, the faint curve is the original for comparison:
Rotate the direction handles to change the angle of the curves. Select a handle while holding "Ctrl" (Win) / "Command" (Mac) to rotate both handles together.
The Dreaded "Loop"
One thing you want to avoid is rotating the handles too far, which will cause your path segments to overlap and create loops. Here, I've rotated my handles all the way around so that the left handle is now on the right and the right handle is on the left, and notice what's happened. My path segments are now overlapping each other, creating a loop:
Rotating the direction handles too far causes the path segments to overlap, creating an unwanted loop in the path.
Loops can be caused by rotating the direction handles too far, as I've done above, but more often than not, they're caused by a handle being too long, making the curve too long and causing it to overlap with itself. If that happens, which it does sometimes as you're drawing a path, simply shorten the length of the direction handle. Most people end up creating a whole bunch of loops in their path when they first start working with the Pen Tool, so don't think you're the only one. No need to panic or become frustrated though. As I said, the problem is most likely being caused by a direction handle being too long, and all you need to do is shorten the handle to "un loop" the loop!
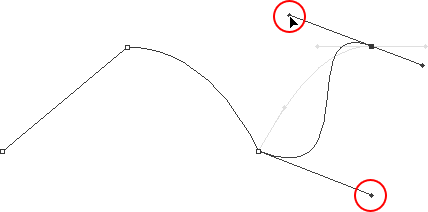
I'm going to press Ctrl+Alt+Z (Win) / Command+Option+Z (Mac) a few times once again to undo my changes and reset my path back to the nice smooth arc I started with. Now, what about rotating the direction handles independently of each other? As we learned on the previous page, to rotate the handles separately, instead of selecting them with "Ctrl/Command", we simply select them while holding down Alt (Win) / Option (Mac), which gives us temporary access to the Convert Point Tool. Click on the end of a handle to select it, then drag it with your mouse to rotate it and this time, the other handle will stay in place, breaking the connection between them.
Here, I've selected the handle on the right while holding "Alt/Option" and then rotated it down and to the left. Notice how once again, the angle of the path segment on the right changes to match the new direction of the handle, and this time, the handle on the left, along with the path segment on the left, both stay in place. My path now looks a bit like a shark fin:
Hold down "Alt" (Win) / "Option" (Mac) to temporarily access the "Convert Point Tool", then click on the end of a direction handle to select it and rotate it independently of the other handle.
Moving An Anchor Point
One thing we haven't looked at yet is how to move an anchor point. If you recall, I mentioned on the previous page that the Pen Tool is extremely forgiving, and one of the reasons for it, besides being able to rotate and resize our direction handles after we've created them, is that we can easily move anchor points from one spot to another if we need to. As we've already learned, anchor points anchor a path into place. The anchor points themselves, however, are not anchored into place. You can move an anchor point anywhere, anytime, and any path segments that are connected to it will move and adjust right along with it.
To move an anchor point, hold down Ctrl (Win) / Command (Mac) to temporarily access the Direct Selection Tool as we've already been doing, then simply click on the anchor point to select it and drag it to its new location with your mouse. Any path segments connected to it will move with it to the new location. Here, I've dragged my middle anchor point down a bit from its original location (again, the faint path marks the original location for comparison). Notice how the path itself has changed shape to adjust to the new location of the anchor point:
Hold down "Ctrl" (Win) / "Command" (Mac) and click on an anchor point to select it, then drag it to a new location. Any path segments connected to the point will move with it, changing shape as needed.
Normally, when outlining an object with a path to select it using the Pen Tool, you won't need to move to an anchor point quite as far as what I've done above, but it's very common to go back around your path after you've created it and nudge a few anchor points here and there to fine-tune the path. Once you've selected an anchor point, you can nudge it up, down, left or right using the arrow keys on your keyboard.
Combining Straight Paths With Curves
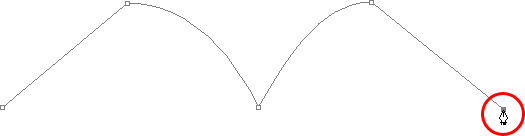
What if I didn't want both of my path segments to be curves? What if what I needed was for the first path segment to be curved, but the second one needed to be straight? Let's see how to do that. I'm going to delete my existing path and start over again. First, I'll click to add an anchor point to start things off. Then, just as before, I'll click to add a second anchor point up and to the right of my initial point, and this time, I'll drag out direction handles, which will create a curved path connecting the two points, giving me exactly what I had way up at the start of this page:
Click once to add an anchor point, then click to add a second anchor point and drag out direction handles to create a curve.
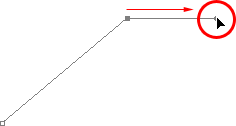
I now have my initial curve, but I want my next path segment to be straight. If I was to simply click somewhere to add another anchor point right now, I would get another curve because I have that direction handle extending out from the right side of the last anchor point I added. What I need to do is get rid of that one direction handle. Without a direction handle controlling the angle and length of a curve, we get a straight line.
To remove the handle, leaving only the handle on the left of the anchor point, all I need to do is hold down Alt (Win) / Option (Mac), which will again temporarily switch me to the Convert Point Tool, and then I just click directly on the anchor point. When I do, the direction handle on the right disappears, leaving only the one on the left:
Hold down "Alt" (Win) / "Option" (Mac) and click directly on the anchor point to remove the direction handle on the right, leaving only the one on the left.
Now, with the direction handle gone, if I click to add a new anchor point, I get a straight path segment between the two points :
With the direction handle on the right now gone, clicking to add a new anchor point adds a straight path segment between the two points.
I now have a curved path segment on the left and a straight one on the right! What if I wanted the exact opposite? Suppose I needed to start with a straight path segment and then follow it with a curve? To do that, first I'll start by clicking to add an initial anchor point. Then, since I want a straight path segment, all I need to do is click somewhere else to add a second anchor point, and I automatically get a straight path connecting the two points:
Click with the Pen Tool to add an initial anchor point, then click again somewhere else to add a second anchor point and create a straight path segment between them.
I'm going to keep my mouse button held down after clicking to add my second anchor point because I want my next path segment to be curved, and we know that in order to create a curve, we need a direction handle. To add a handle extending out from the right of my anchor point, I'm going to hold down Alt (Win) / Option (Mac), and with my mouse button still down, I'm simply going to to drag to the right of the anchor point. As I do, a direction handle will drag out along with it:
Hold down "Alt" (Win) / "Option" (Mac) and drag out a direction handle on the right of the anchor point.
Notice that the direction handle extended only from the right of the anchor point, not from both sides, leaving my straight path segment on the left in place. And now that I have my direction handle on the right, all I need to do to create my curve is click to add a third point:
Click to add a third anchor point, which creates a curved path segment between the previous anchor point and the new one.
And there we go! I now have a straight path segment on the left, followed by a curved segment on the right. Of course, most paths you draw are going to consist of more than just three anchor points. Let's say I wanted to continue this path, moving in the same general direction towards the right, and I want my next path segment to be curved as well. Just as I did a moment ago, I would leave my mouse button held down after clicking to add my third point. I would hold down Alt (Win) / Option (Mac) and I would drag out another direction handle. So far, we've only been dragging handles out towards the right, but what you really want to do is drag your handles out in the general direction you want the curve to follow. I want to create a curve that goes up and to the right, so I'm going to drag out a small handle in that same general direction:
Drag out your direction handles in the general direction of the curve.
Näpunäide! A good practice to get into is to keep your direction handles small when first dragging them out, since you never really know how long or at what exact angle they need to be until the actual curve appears, and the curve doesn't appear until you've added both of its anchor points. Once you've added both points and the curve appears, you can easily go back and make any adjustments you need to the handles. You may even want to wait until you've drawn the entire path before worrying about adjusting the handles.
With my direction handle created, I'm going to click to add a fourth anchor point, and I'm going to drag out direction handles from it as well:
Adding a fourth anchor point along with direction handles extending from it.
I now have a third segment added to my path, this one being a curve. Notice that this curve actually has two direction handles controlling it, one extending from the right of my third anchor point and one extending from the left of my fourth point:

The third path segment now has two direction handles, one on either end, working together to control the curve.
The overall shape of this curve is now being controlled by the length and direction of both of these handles. Watch what happens to the curve when I move the handles. I'll drag the bottom handle down and to the right, and I'll drag the top handle up and to the left. I'll also drag both of these handles longer. The faint curve is the original for comparison:
Changing the direction and/or length of either handle changes the overall shape of the curve. After rotating and lengthening both handles, the curve now appears in an "S" shape.
The curve is now a bit "S" shaped, and that's because the bottom handle is controlling the angle and length of the curve as it flows out from the third anchor point, while the top handle is controlling the angle and length of the curve as it flows into the fourth point. Changing the length and/or direction of either handle will change the overall shape of the curve.
I'm going to press Ctrl+Alt+Z (Win) / Command+Option+Z (Mac) a couple of times to undo the changes I made, so the curve is once again in a simple arc shape as it was a moment ago, and I think I'll finish off this path with another straight segment, which means I'll need to remove that direction handle extending out from the right side of the fourth anchor point. We've already learned how to do that, by holding down Alt (Win) / Option (Mac) and clicking directly on the anchor point itself:
Hold down "Alt" (Win) / "Option" (Mac) and click directly on the anchor point to remove the direction handle on the right.
With the direction handle gone, all I need to do now to add a straight path segment is click to add another anchor point:
The direction handle on the right is now gone, so we can add a straight path segment simply by clicking to add another anchor point.
We could continue this path for as long as we wanted, adding more straight segments and curves, but I think we'll stop here because we've pretty much covered everything we need to know about drawing paths with the Pen Tool at this point. That was a lot of information to take in, especially if this is your first time learning about paths. As I mentioned at the beginning, you won't become a Pen Master simply by reading through this tutorial, just as you won't learn how to ride a bike, or drive a car, learn to swim, or play the piano simply by reading about it. But hopefully you have some sense at this point of how to draw paths with the Pen Tool, how to draw straight path segments, how to draw curves by dragging out direction handles, how to change the length and angle of the curve by rotating and resizing the handles, and how to combine straight and curved segments in a path.
To finish off our look at making selections with the Pen Tool, let's see a practical example of how to select an object with curves.
Here, we have a photo of a couple of dolphins leaping out of the water. Definitely a couple of very curvy creatures:
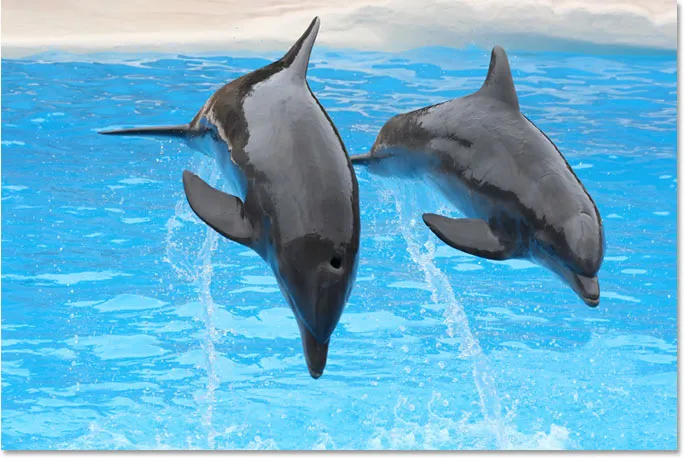
A photo of two dolphins jumping out of the water.
Let's say we want to select these dolphins so we can use them for a design or a collage, or whatever the case may be. If you were to try selecting them with the Lasso Tool, which is most likely what you would end up using if you didn't know how to use the Pen Tool, not only would you have a tough time, you'd have an even tougher time trying to convince yourself that you were happy with the results when you were done. The reason is because the Lasso Tool simply isn't capable of making curved selections very well. The biggest problem with it, besides being a pixel-based selection tool, is that it relies on you having a steady enough hand to move it smoothly around the curves. Even if you don't suffer from a caffeine addiction, you could drive yourself crazy trying to draw a perfectly smooth curve with your mouse, or even with a pen tablet, and when you've finally given up, you'll still be left with a selection full of rough, jagged edges that just scream "amateur!". No one likes to be called an amateur, especially when there's no need for it thanks to the Pen Tool!
Examine The Object First
Whenever you're about to select something with the Pen Tool, before you begin, take a moment to examine the object carefully to get a sense of where you're going to need to place your anchor points. Forget about all the details in the object and focus only on its shape. Where are the areas where the shape changes direction? Which parts of the shape are straight? Which parts are curved? If there's a curve, is it a smooth, continuous arc or does the angle change at a spot along the curve? Visualize in your mind where you're going to need to place your anchor points, because when you place one, you always want to be thinking about the next one and what the path segment between the two points needs to look like.
A Tool Of Elegance
One more thing to keep in mind is that the Pen Tool is meant to be a tool of elegance . It's not a nail gun or a staple gun. You don't want to just go clicking around your shape adding anchor points all "willy nilly" (that's a technical term). When using it to draw curves, you want those curves to be nice and smooth, otherwise we might as well just stick with the Lasso Tool. To keep the curves flowing smoothly, we need to limit the number of anchor points we use to create them. That's why you want to take a moment to examine the object first and visualize where the anchor points need to be. If you can outline a large section of the shape using only one curve with an anchor point on either end, that's what you want to do, because that's what's going to give you the kind of results you're looking for. The kind of results that scream "definitely not an amateur!".
Let's select these dolphins. I'm going to start my path in the middle of the photo, at the spot where the side of the dolphin on the left overlaps the rear flipper of the dolphin on the right. There's no right or wrong place to begin a path. This is just where I've decided to start. The first part of that rear flipper is straight, so since I don't need a direction handle to create a straight path segment, I'm simply going to click once with my Pen Tool to add my first anchor point, which will serve as the starting point for my path:
Adding the first anchor point.
As I mentioned earlier, you'll probably find it helpful to zoom in on your image as you're drawing your path. To scroll the image around on the screen as you're zoomed in, hold down the spacebar, which will switch you temporarily to the Hand Tool and allow you to move the image around on the screen by clicking and dragging it.
The top of that flipper actually has a slight curve to it as it approaches the dolphin's tail section, so for my second anchor point, I'm going to click at the point where the flipper and tail section meet, and I'm going to drag out short direction handles, dragging up and to the right in the direction that the tail section is moving. Notice that I've now created a slight curve along the flipper:
Adding the second anchor point and dragging out small direction handles to add a slight curve to the first path segment.
As I continue up along the tail, I can see that it stays straight for a short distance, followed by a curve to the right, so I'm going to click to add a third anchor point at the spot where the curve begins. This gives me a straight path segment between the previous point and the new one. I know there's a short direction handle extending out from the previous anchor point, which normally means that my new path segment will be a curve, not a straight section, but because the handle is so short and is also moving in the same direction as the path segment, there is no noticeable curve to it. Consider it a "mostly straight" path segment:
Clicking to add the third anchor point, creating a (mostly) straight path segment.
Continuing along, we come to the first real curve in our path. For this, I'm going to need to drag out a direction handle from the anchor point I just added, so I'm going to hold down Alt (Win) / Option (Mac), then drag out a handle in the general direction where I want the curve to flow as it starts. Notice how I'm only dragging out a handle from the one side of the anchor point, not both:
Hold "Alt" (Win) / "Option" (Mac) to drag out a direction handle from one side of an anchor point.
To add the curve, I'll click and drag at the spot where the curve ends, shaping the curve as I drag out the handles until it matches the curve of the dolphin's tail. If I needed to, I could also go back and change the length and direction of the handle at the start of the curve to fine-tune it, but in this case, I don't need to do that:
Adding an anchor point at the opposite end of the curve and dragging out direction handles from it, rotating and resizing them as needed until the curve matches the curve of the object.
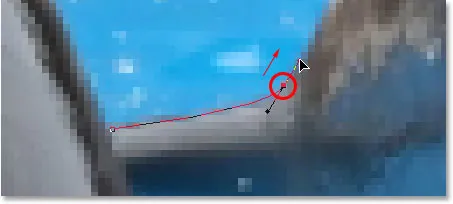
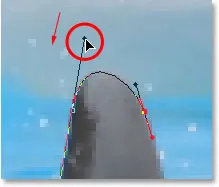
The next area of the dolphin is pretty straight, right up until its back begins to merge with its dorsal fin, at which point there's another curve, so I'm going to click to add an anchor point just before the curve up the dorsal fin begins, which is going to give me another "mostly straight" path segment between the previous point and the new point. Then I'm going to once again hold down Alt (Win) / Option (Mac) and drag out a direction handle as I prepare for my next path segment which will be curved:
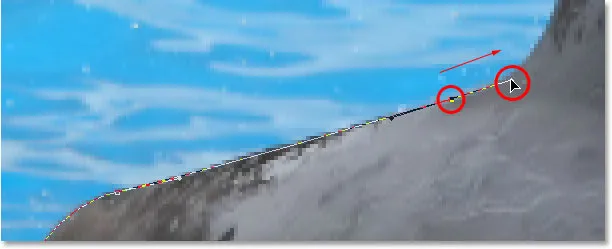
Click to add an anchor point, then hold down "Alt" (Win) / "Option" (Mac) and drag out a direction handle to prepare for the next path segment.
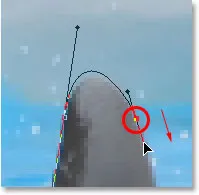
The left side of the dorsal fin consists mainly of one continuous curve upward until it gets near the very top, at which point the shape changes, so to create this curve, I'm going to click and drag at the point near the top where the curve will change direction. As we can see in the screenshot, this adds a curved path segment between the previous anchor point and the new one, but the curve is not yet following along the shape of the fin. It's going to need some fine-tuning:
Adding a curve along the left side of the dorsal fin. The curve still needs some adjusting.
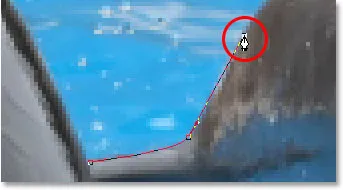
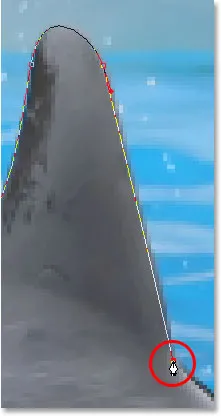
To adjust the curve, I'm simply going to hold down the Ctrl (Win) / Command (Mac) key, which gives me temporary access to the Direct Selection Tool, and I'm going to drag the handle extending out from the bottom anchor point towards the right to lengthen it, which is going to pull the angle of the curve in towards the right along with it, lining it up nicely with the curve of the fin. I've also rotated the top direction handles slightly in a clockwise direction just to be nit-picky, but the majority of the adjustment was done using the bottom direction handle:
Adjust the curve by adjusting its direction handles.
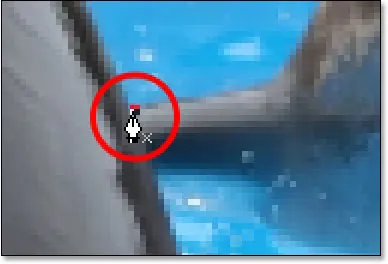
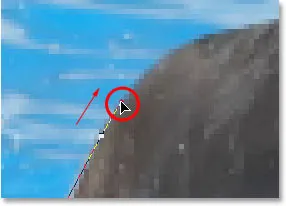
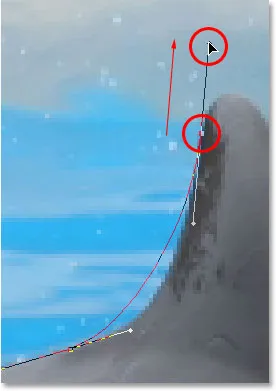
To add a curve around the top of the fin, I'll click and drag on the opposite side of it to add another anchor point with short direction handles. Notice though that we run into a bit of a problem. The direction handle on the left side of the curve is too long and it's pulling the curve away from the top of the fin:
The direction handle on the left of the curve is too long, resulting in the curve not following the shape of the fin.
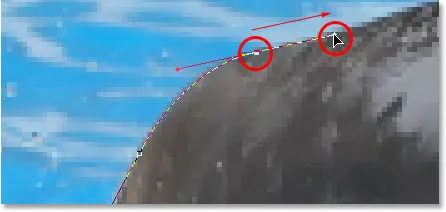
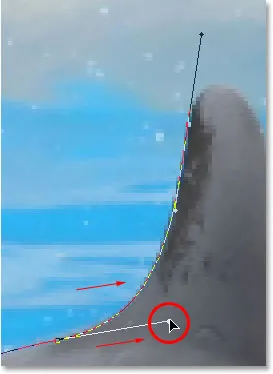
To fix that, all I need to do is once again hold down Ctrl (Win) / Command (Mac), then click on the end of the handle to select it and drag it shorter until the curve is the proper shape:
Shortening the length of the direction handle to adjust the shape of the curve.
Let's finish creating our path around the dorsal fin. The remainder of the fin is basically a straight line, so I'm going to click at the base of the fin to add another anchor point which adds the straight path segment, completing our path around the fin:
Adding an anchor point at the base of the fin to finish drawing the path around it.
Since you and I would both be here all day if I was to continue commenting on every anchor point, direction handle and path segment as we make our way slowly around the dolphins, and since we've covered everything we need to know at this point, I'm going to go ahead and draw the rest of the path, outlining both dolphins:
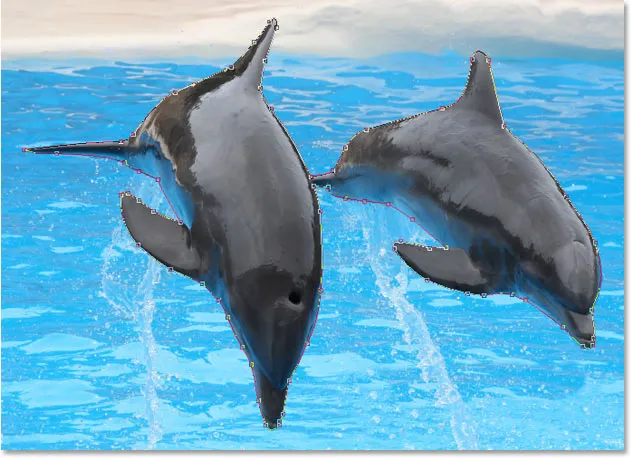
Both dolphins are now outlined by the path.
The dolphins have now been outlined with the path, and if we look at the Paths palette, we can see that sure enough, we have a path in the shape of the dolphins:
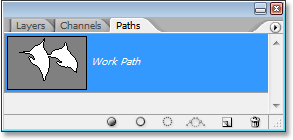
Photoshop's Paths palette showing the outline of the dolphins in the preview thumbnail.
As we've learned, Photoshop automatically names the path "Work Path", which means it's temporary and will be replaced if we start a new path. If you wanted to save it, you would need to double-click on the name "Work Path" and rename it to something else, like "Dolphins" in this case. I'm not going to worry about that, since I have no need to save it. All I want to do at this point is convert my path into a selection, and since I'm already in the Paths palette, I'll do that by clicking on the Load path as selection icon at the bottom of the palette:
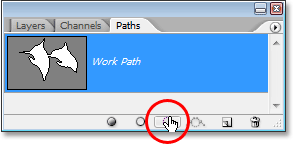
Clicking the "Load path as selection" icon at the bottom of the Paths palette.
I could also have used the keyboard shortcut Ctrl+Enter (Win) / Command+Return (Mac) . Either way converts my path into a selection, and if I look at my photo, I can see that my path has indeed become a selection around the dolphins:

The path around the dolphins has now been converted into a selection.
Kuhu edasi minna …
Ja seal see meil on! The dolphins are now selected and ready for whatever plans we have for them. And with that, we wrap up our look at drawing paths and making selections with the Pen Tool in Photoshop! Lisateavet Photoshopi valimisriistade kohta leiate jaotisest Kuidas teha valikuid Photoshopi seerias. Lisateavet Photoshopi teemade kohta leiate meie jaotisest Photoshopi põhitõed!